


Project Level: Beginner
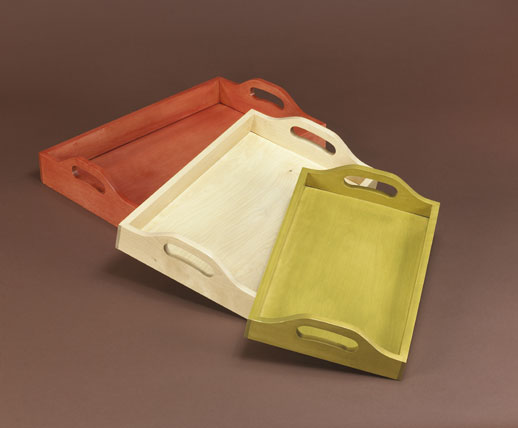
You could never have too many trays for serving snacks or drinks! These sturdy trays are easy to build and you may even have enough wood scarps around to build them without buying more wood! If you don’t have any laying around this is still an inexpensive and simple project to complete.
What Do You Need?
- Usual arsenal of tools
- Adjustable-jaw clamps
- Mallet
- Chisel
- Table saw with combination rip/crosscut blade and dado blades
- Router table, 3/4″ dia. straight-cut bit, flush-trim bit
- Drill press, 7/8″- and 1″- dia. Forstner bits
- Jigsaw
- Oscillating spindle sander or sanding drum for drill press, 3″ and 3/4″ spindles
- Table saw
- Jigsaw
- Router with a beading bit
- 120-, 180- and 220-grit sandpaper
To see a full list of tools and supplies, as well as detailed instructions and plans, download the project guide.
Before You Begin
Make sure you follow the directions carefully while practicing and developing your safe working habits. Wear your safety goggles and the appropriate respirator when it is necessary.


For Your Nesting Trays Project
We recommend using birch or pine. You can see the nesting trays project guide for cutting plans and assembly steps.
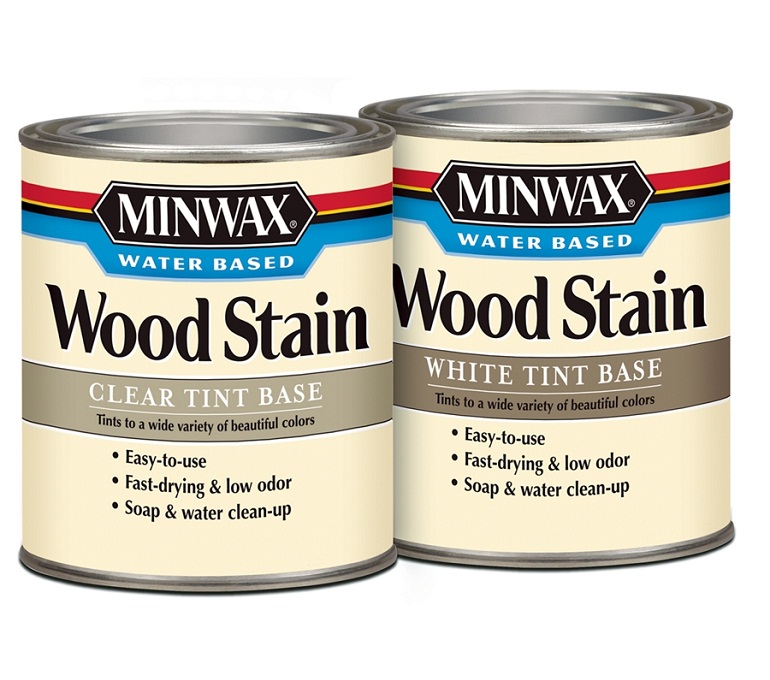
Recommended Finish: Minwax® Water Based Wood Stain (Spice, Mediterranean Olive, and Parchment OR Midnight Blue, Botanical, and English Oak) or choose your favorite stain color.
Before staining your nesting trays, sand the corners and any other rough spots with 220-grit sandpaper. Dust off the piece and wipe it carefully with a clean, lint-free cloth lightly dampened with mineral spirits.
Make sure to apply Minwax® Water-Based Pre-Stain Wood Conditioner following the directions on the can. After 1 to 5 minutes, wipe off all excess conditioner using a clean, lint-free cloth. Wait 15 to 30 minutes then use fine-grade paper to sand off any “whiskers” from the conditioner. Make sure to stain within 2 hours.
Do the staining in two steps, starting on the interior surfaces and then moving to the exterior surfaces. Apply the Minwax® Water-Based Wood Stain you’ve chosen to the surface using either a nylon/polyester brush or a cloth. Allow stain to penetrate no longer than 3 minutes. While stain is still wet, wipe off all excess with a clean cloth that’s been lightly dampened with stain. Allow the piece to dry for 2 hours before applying a second coat, if desired. Allow the piece to dry overnight before applying a protective clear finish.
For full instructions on staining and finishing, download the project guide.
Useful Tips
- Always test the stains and finishes you have selected on a scrap of wood. On the back of the scrap, mark the stain/finish combination and the type of wood. This is important so you can make sure you like how the color will turn out before staining your trays.
- All stains and finishes should dry thoroughly between each coat. Keep in mind these drying times may vary depending on humidity, temperature and other climatic conditions.
- If you have some leftover stain or finish, wipe the can rim so that stain or finish in the rim won’t dry out and prevent the lid from forming a tight seal.
- Brushes used for water-based products, such as Minwax® Water-Based Wood Stains or Minwax® Polycrylic® Protective Finish, should be cleaned with soap and water; oil-based finishes must be cleaned with mineral spirits.
Ready for another project?
If you’re ready for another tray project, download the country flag tray plan here.
For some of Bruce’s tray projects, Check out “A Colorful Serving Tray” and “A Tray for All Seasons”
We’d love to see your finished projects! Share photos of your step-by-step process or finished product on our Facebook page.
